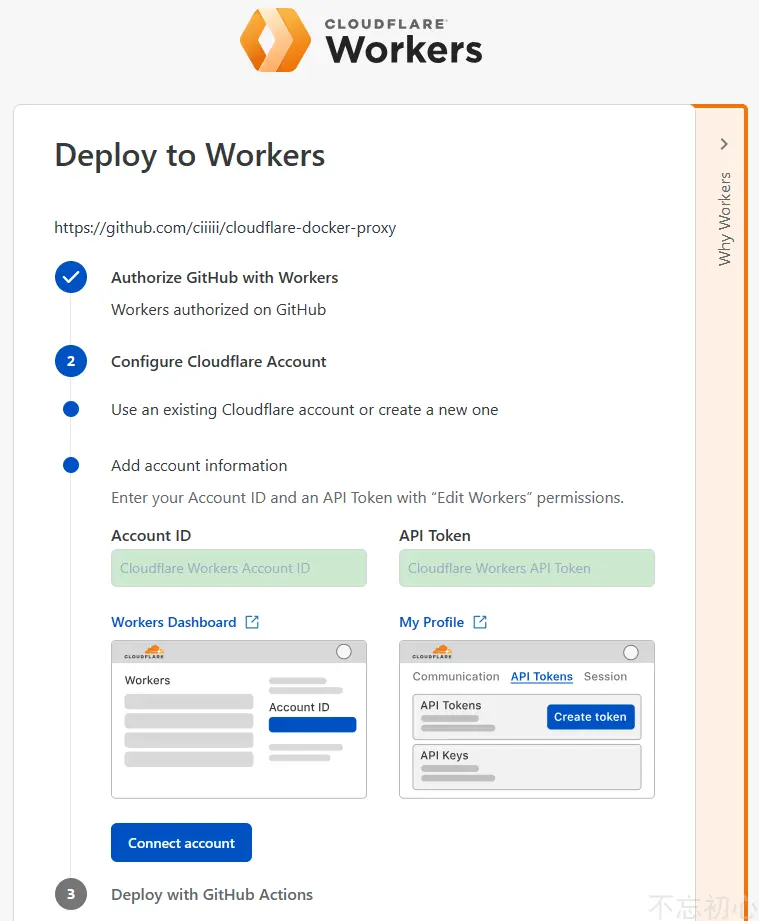
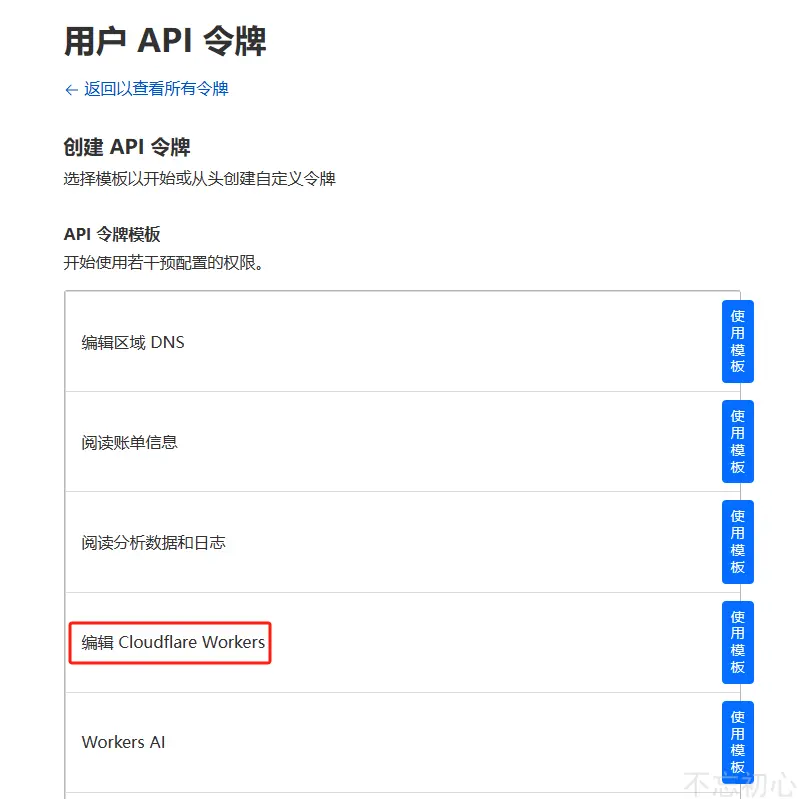
最近,受限于各种情况,部分主流镜像站都关了,为了能够正常使用,建议自己搭建一个加速器。 写文之前,也已经部署好了一个,可以直接使用,具体使用方法跳转 https://docker.haoz.us.kg/ ###准备工作 1)首先要注册一个 Cloudflare 账号 2)Cloudflare 账号下需要添加一个域名 ##部署流程 ###修改配置 首先 fork https://github.com/ciiiii/cloudflare-docker-proxy 仓库到自己账号下。 ####然后修改 `src/index.js`,修改内容如下: ```java const routes = { // production "docker.haoz.us.kg": dockerHub, "quay.haoz.us.kg": "https://quay.io", "gcr.haoz.us.kg": "https://gcr.io", "k8s-gcr.haoz.us.kg": "https://k8s.gcr.io", "k8s.haoz.us.kg": "https://registry.k8s.io", "ghcr.haoz.us.kg": "https://ghcr.io", "cloudsmith.haoz.us.kg": "https://docker.cloudsmith.io", // staging "docker-staging.haoz.us.kg": dockerHub, }; ``` 其中 `haoz.us.kg` 就是你的域名,改成你自己的 ####再修改 `wrangler.toml`,同样是替换域名 ```toml [env.production] name = "cloudflare-docker-proxy" routes = [ { pattern = "docker.haoz.us.kg", custom_domain = true }, { pattern = "quay.haoz.us.kg", custom_domain = true }, { pattern = "gcr.haoz.us.kg", custom_domain = true }, { pattern = "k8s-gcr.haoz.us.kg", custom_domain = true }, { pattern = "k8s.haoz.us.kg", custom_domain = true }, { pattern = "ghcr.haoz.us.kg", custom_domain = true }, { pattern = "cloudsmith.haoz.us.kg", custom_domain = true }, ] [env.staging] name = "cloudflare-docker-proxy-staging" route = { pattern = "docker-staging.haoz.us.kg", custom_domain = true } ``` ####最后修改 README.md 中的 图标对应的 Github 仓库地址为你 fork 后的仓库地址,比如: 可以批量替换github用户名: 比如我的就是将原作者的`ciiiii`替换为`crossgg` 这三个修改都完成后,提交代码。 ###帮助文档 为了便于使用,可以在访问根目录时返回一个帮助页面。 help.html 新建一个help.html 文件,内容如下: ```html <!DOCTYPE html> <html lang="zh-CN"> <head> <meta charset="utf-8"> <meta name="viewport" content="width=device-width, initial-scale=1"> <title>镜像使用说明</title> <style> body { font-family: 'Roboto', sans-serif; margin: 0; padding: 0; background-color: #f4f4f4; } .header { background: linear-gradient(135deg, #667eea, #764ba2); color: #fff; padding: 20px 0; text-align: center; box-shadow: 0 2px 4px rgba(0, 0, 0, 0.1); position: relative; } .github-link { position: absolute; top: 10px; right: 20px; color: #fff; text-decoration: none; } .github-icon { width: 24px; height: 24px; vertical-align: middle; } .container { max-width: 800px; margin: 40px auto; padding: 20px; background-color: #fff; box-shadow: 0 4px 8px rgba(0, 0, 0, 0.1); border-radius: 10px; } .content { margin-bottom: 20px; } .footer { text-align: center; padding: 20px 0; background-color: #333; color: #fff; } pre { background-color: #272822; color: #f8f8f2; padding: 15px; border-radius: 5px; overflow-x: auto; } code { font-family: 'Source Code Pro', monospace; } a { color: #4CAF50; text-decoration: none; } a:hover { text-decoration: underline; } @media (max-width: 600px) { .container { margin: 20px; padding: 15px; } .header { padding: 15px 0; } } </style> <link href="https://fonts.googleapis.com/css2?family=Roboto:wght@400;700&family=Source+Code+Pro:wght@400;700&display=swap" rel="stylesheet"> </head> <body> <div class="header"> <h1>镜像使用说明</h1> <a href="https://github.com/crossgg/cloudflare-docker-proxy" target="_blank" class="github-link"> <img src="https://github.githubassets.com/images/modules/logos_page/GitHub-Mark.png" alt="GitHub" class="github-icon"> </a> </div> <div class="container"> <div class="content"> <p>为了加速 Docker 镜像拉取,你可以使用以下命令设置 registry mirror:</p> <pre><code id="registry-config">sudo tee /etc/docker/daemon.json <<EOF { "registry-mirrors": ["https://{{host}}"] } EOF # 配置完后需要重启 Docker 服务 sudo systemctl restart docker </code></pre> <p>使用该代理从不同的镜像仓库拉取镜像,请参考以下命令:</p> <pre><code id="commands"> # docker pull nginx:latest docker pull docker.haoz.us.kg/library/nginx:latest # 拉取 Docker 官方镜像 # docker pull quay.io/coreos/etcd:latest docker pull quay.haoz.us.kg/coreos/etcd:latest # 拉取 Quay 镜像 # docker pull gcr.io/google-containers/busybox:latest docker pull gcr.haoz.us.kg/google-containers/busybox:latest # 拉取 GCR 镜像 # docker pull k8s.gcr.io/pause:latest docker pull k8s-gcr.haoz.us.kg/pause:latest # 拉取 k8s.gcr.io 镜像 # docker pull registry.k8s.io/pause:latest docker pull k8s.haoz.us.kg/pause:latest # 拉取 registry.k8s.io 镜像 # docker pull ghcr.io/github/super-linter:latest docker pull ghcr.haoz.us.kg/github/super-linter:latest # 拉取 GitHub 容器镜像 # docker pull docker.cloudsmith.io/public/repo/image:latest docker pull cloudsmith.haoz.us.kg/public/repo/image:latest # 拉取 Cloudsmith 镜像 </code></pre> <p>为了避免 Worker 用量耗尽,你可以手动 pull 镜像然后 re-tag 之后 push 至本地镜像仓库。</p> </div> </div> <div class="footer"> <p>Powered by Cloudflare Workers</p> <p><a href="https://lixueduan.com" target="_blank">访问博客 探索云原生</a></p> </div> <script> document.addEventListener('DOMContentLoaded', function() { const host = window.location.hostname; const mainDomain = host.split('.').slice(-2).join('.'); const registryConfigElement = document.getElementById('registry-config'); const commandsElement = document.getElementById('commands'); registryConfigElement.innerHTML = registryConfigElement.innerHTML.replace(/{{host}}/g, host); commandsElement.innerHTML = commandsElement.innerHTML.replace(/{{host}}/g, mainDomain); }); </script> </body> </html> ``` ####增加路由 `scr/index.js` 中增加一条路由,访问根目录时就返回这个帮助页面 ```java import DOCS from './help.html' // return docs if (url.pathname === "/") { return new Response(DOCS, { status: 200, headers: { "content-type": "text/html" } }); } ``` ###点击部署 然后在 Github 界面点击图标进行部署,会自动跳转到 cloudflare,按步骤操作即可,最终会在 Github 仓库中创建一个 Github Action 来将该仓库部署到 Cloudflare Workers。 就像这样:  此处 `Account ID` 即首页 URL 后一串字符,https://dash.cloudflare.com/xxxxxxxxxxx `API Token` 在个人资料页面,选择 api 令牌创建  Deploy 部署后如下  ------------ > 参考 1. https://songxwn.com/cf-works-DockerHub-Proxy/ 2. https://www.lixueduan.com/posts/docker/12-docker-mirror/ 3. WMI Scripting HTML 当前访问者IP地址及地址归属: Last modification:June 19th, 2024 at 09:49 am © 允许规范转载 Support 如果觉得我的文章对你有用,请随意赞赏 ×Close Appreciate the author Sweeping payments