## 1、反向代理 网站 —— 创建站点 —— 反向代理,填写你的公开访问域名,如 dashboard.demo.com,代理地址填写 http://127.0.0.1:8008 并确认保存。 打开配置文件菜单,在最后面加上以下代码,然后点保存并重载: ```shell underscores_in_headers on; set_real_ip_from 0.0.0.0/0; real_ip_header nz-realip; upstream dashboard { keepalive 512; server 127.0.0.1:8008; } ``` 打开反向代理 —— 配置,将里面的内容全选删除,并替换为以下代码,然后点确认: ```shell location ^~ / { proxy_pass http://127.0.0.1:8008; proxy_set_header Host $host; proxy_set_header X-Real-IP $remote_addr; proxy_set_header X-Forwarded-For $proxy_add_x_forwarded_for; proxy_set_header REMOTE-HOST $remote_addr; proxy_set_header Upgrade $http_upgrade; proxy_set_header nz-realip $http_cf_connecting_ip; proxy_set_header Connection "upgrade"; proxy_set_header X-Forwarded-Proto $scheme; proxy_http_version 1.1; proxy_read_timeout 1800s; proxy_send_timeout 1800s; proxy_buffer_size 128k; proxy_buffers 4 128k; proxy_busy_buffers_size 256k; proxy_max_temp_file_size 0; add_header X-Cache $upstream_cache_status; add_header Cache-Control no-cache; proxy_ssl_server_name on; add_header Strict-Transport-Security "max-age=31536000"; } # gRPC 服务 location ^~ /proto.NezhaService/ { grpc_set_header Host $host; grpc_set_header nz-realip $http_cf_connecting_ip; grpc_read_timeout 600s; grpc_send_timeout 600s; grpc_socket_keepalive on; client_max_body_size 10m; grpc_buffer_size 4m; grpc_pass grpc://dashboard; } # WebSocket 服务 location ~* ^/api/v1/ws/(server|terminal|file)(.*)$ { proxy_set_header Host $host; proxy_set_header nz-realip $http_cf_connecting_ip; proxy_set_header Origin https://$host; proxy_set_header Upgrade $http_upgrade; proxy_set_header Connection "upgrade"; proxy_read_timeout 1800s; proxy_send_timeout 1800s; proxy_pass http://127.0.0.1:8008; } ``` ## 2、绑定github登录 #### 1、登录 GitHub 获取密钥参数 登录 Github 后台,点击路径 "Setting-->Developer Setting"进入: 进入“OAuth Apps”,如果你安装过哪吒面板 V0,直接用原来的密钥就可以了,只需要改下 URL,如果是不是用原来的OAuth Apps,那就点击右上角“New OAuth App”新建一个。 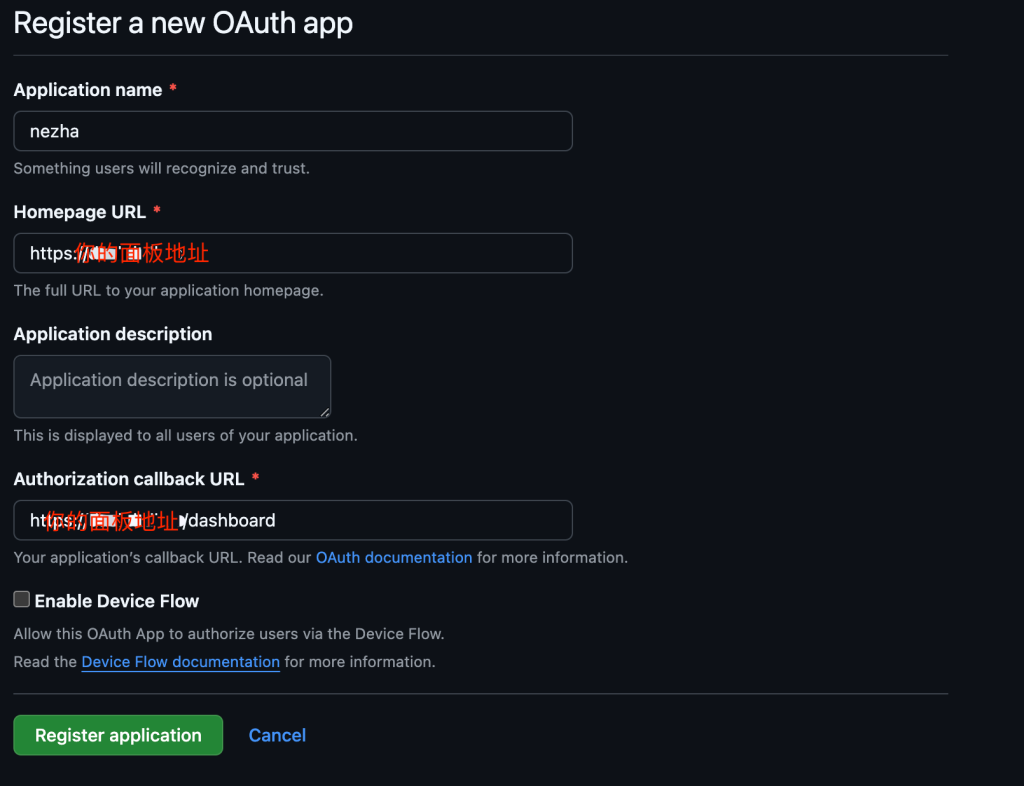 #### 2、填好面板地址以及 callback URL之后点击 "Register application" 提交。 Authorization callback URL为:https://nezha.example.com/api/v1/oauth2/callback  点击 Client secrets 右边的按钮生成一个新的密钥。记下“clientid”和“clientsecret”两个值,后面会用到。生成新密钥之后点击最底下的“Update application”按钮提交即可。 配置面板文件 找到后台的配置文件目录,Docker 安装的话默认为:/opt/nezha/dashboard/data 编辑 `config.yaml` 文件,在末尾添加以下内容: (参考:https://nezha.wiki/guide/q14.html) ```yaml oauth2: GitHub: client_id: "a-unique-id" client_secret: "a-unique-secret" endpoint: auth_url: "https://github.com/login/oauth/authorize" token_url: "https://github.com/login/oauth/access_token" user_info_url: "https://api.github.com/user" user_id_path: "id" ``` #### 绑定账户 在配置好 OAuth 2.0 信息后,登录后台,点击右上角头像进入个人设置。 在个人信息页的卡片列表里可以看见 OAuth 2 绑定的字样,其中有您所填写的 OAuth 2.0 配置名及其对应用户。点击配置名右侧的 绑定 按钮就可以跳转到认证页面进行账户绑定。 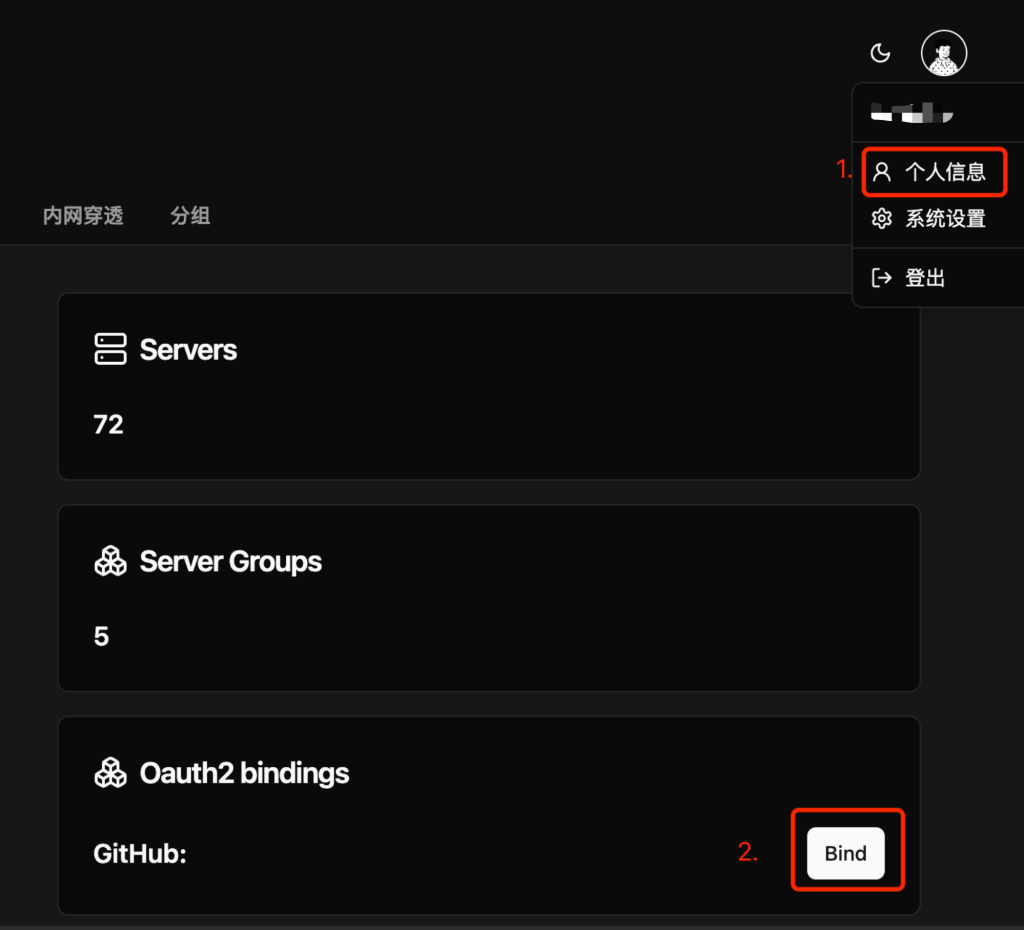 完成绑定后,便可以使用登录页下方的 OAuth 2 按钮登录您的账户。 #### 禁止密码登录 在更新个人信息的表单中可以为当前用户启用该选项。 启用后,将无法通过密码登录当前用户,与验证失败的错误一致。 如果当前用户还没有任何 OAuth 2.0 绑定关系,则无法启用该选项;相应地,如果启用了该选项,当前用户只剩下一个 OAuth 2.0 绑定关系时将无法删除此绑定关系。 ## 3关闭ssh 关闭命令执行、在线终端和文件列表 全选服务器,点击右上角黄色齿轮,在Option输入 `disable_command_execute`,Value输入 `true`,再点击 `+` 号提交,即可一键关闭所有服务器的权限 >说明:disable_command_execute 当为 true 时 Agent 不再接受面板下达的 命令执行、在线终端 和 文件列表 任务。 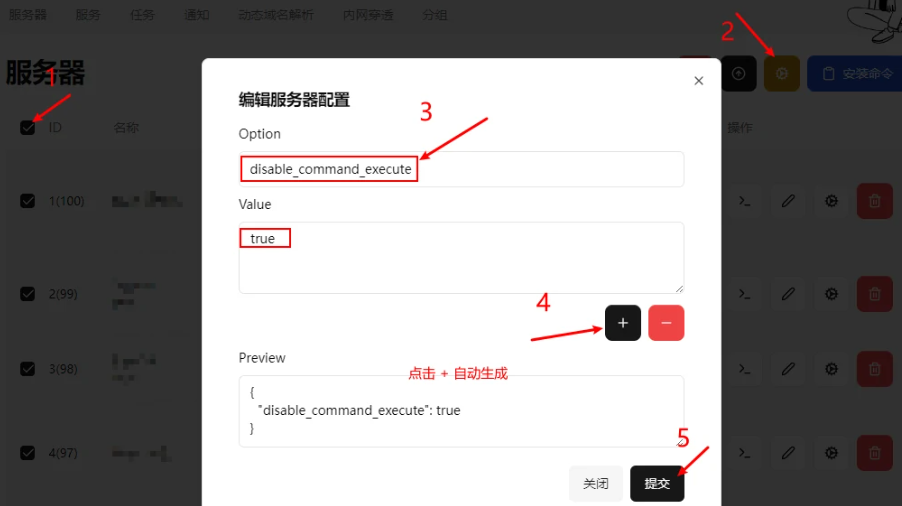 #### 单独关闭某个服务器的权限 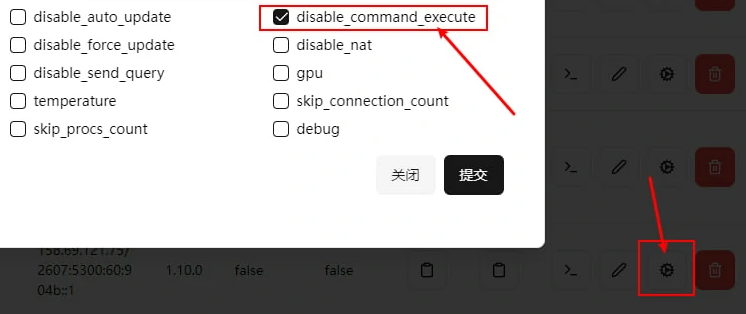 #### 重新开启权限 ssh连接需要重新开启权限的服务器,输入 `vim /opt/nezha/agent/config.yml`,找到 `disable_command_execute`, 改为 `false`,在英文输入法状态下按 `ESC` → `:` → `wq` 保存并退出,重启Agent即可 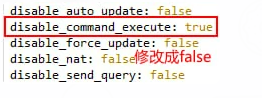 WMI Scripting HTML 当前访问者IP地址及地址归属: Last modification:November 19th, 2025 at 09:24 am © 允许规范转载 Support 如果觉得我的文章对你有用,请随意赞赏 ×Close Appreciate the author Sweeping payments