####通过docker安装 https://blog.aflybird.cn/2023/05/tailscale-derp/ ##其他安装 各客户端安装:https://tailscale.com/download linux服务器安装: ```shell curl -fsSL https://tailscale.com/install.sh | sh ``` ### 安装 Golang(以1.21.5为例) https://go.dev/doc/install ```shell wget https://go.dev/dl/go1.21.5.linux-amd64.tar.gz rm -rf /usr/local/go && tar -C /usr/local -xzf go1.21.5.linux-amd64.tar.gz rm go1.21.5.linux-amd64.tar.gz ``` 配置go,在最下方 `fi`后面添加 ` vim /etc/profile ` ``` export GOROOT=/usr/local/go export GOPATH=/usr/local/gopath export GOBIN=$GOPATH/bin export PATH=$PATH:$GOROOT/bin export PATH=$PATH:$GOPATH/bin ``` 保存后。输入source /etc/profile ,然后输入 `go version`检查有无安装 go 语言成功 国内服务器设置go代理 `go env -w GOPROXY=https://goproxy.cn,direct` ### 安装 derper 服务 ```shell go install tailscale.com/cmd/derper@main ``` 证书 上传到 `/opt/cert` 下载的证书可以直接把 `.pem` 后缀改为 `.crt` cert里面需要两个文件`derper.crt` `derper.key` 这边用的宝塔自签证书,可以创建定时任务把证书复制过去: ```shell cp /www/server/panel/vhost/letsencrypt/域名/fullchain.pem /opt/cert/<你的域名>.crt cp /www/server/panel/vhost/letsencrypt/域名/privkey.pem /opt/cert/<你的域名>.key ``` 用vim建立启动脚本:`vim /usr/local/gopath/bin/runderper` ```shell #!/bin/sh cd /usr/local/gopath/bin nohup ./derper -hostname <你的域名> -c=/opt/derper.conf -a :9991 -http-port -1 -certdir /opt/cert -certmode manual -verify-clients -stun > /opt/derper.log 2>&1 & echo $! > app.pid ``` 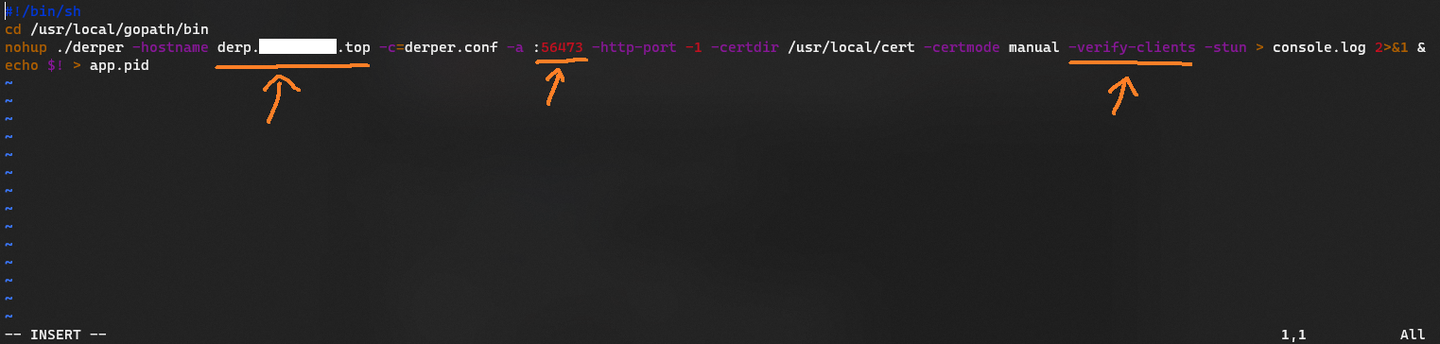 > 参数 -verify-clients用来防止别人(知道你的域名后)白嫖你的中继节点,只认服务器上 tailscale 客户端登录的账号。如果你有给朋友白嫖的需求,可以把这个参数去掉。 建立停止脚本: `sudo vim /usr/local/gopath/bin/stopderper.sh` ```shell #!/bin/sh kill `cat app.pid` rm -rf app.pid ``` 授权 ``` chmod +x /usr/local/gopath/bin/runderper chmod +x /usr/local/gopath/bin/stopderper.sh ``` 然后建立服务。输入 `sudo vim /etc/systemd/system/derper.service`,按 i 进入编辑模式,然后粘贴: ```shell Description=derper服务 After=network.target [Service] Type=forking ExecStart=/usr/local/gopath/bin/runderper ExecStop=/usr/local/gopath/bin/stopderper.sh [Install] WantedBy=multi-user.target ``` 放行derp端口(TCP 9991 和 UDP 3478) ###一些命令 ``` # 查看derper服务状态 systemctl status derper # 启动derper服务 systemctl start derper # 停止derper服务 systemctl stop derper # 设置开机自启 systemctl enable derper ``` 这个时候,打开网址 `https://<你的域名>:9991`,出现以下页面就是部署成功。 ------------ ## 配置 TailScale 客户端使用 DERP 服务器 网页登录 TailScale 账号,打开 控制台的 [Access Control](https://login.tailscale.com/admin/acls "Access Control") 页面,添加这样一段注释(也就是在原来的 json 里加个 "derpMap" 的 key) 主要就是改三个字段,一个是 `HostName`,一个是 `DERPPort` 和 `STUNPort`。 添加下面代码在 ssh 前面: ```yaml "derpMap": { // OmitDefaultRegions 用来忽略官方的中继节点,一般自建后就看不上官方小水管了 "OmitDefaultRegions": true, "Regions": { // 这里的 901 从 900 开始随便取数字 "901": { // RegionID 和上面的相等 "RegionID": 901, // RegionCode 自己取个易于自己名字 "RegionCode": "腾讯-北京", "Nodes": [ { // Name 自己的derp "Name": "tx-bj", // 这个也和 RegionID 一样 "RegionID": 901, // 域名 "HostName": "你的域名", // IP 可以不填 "IPv4": "IP地址", // 自建端口号 "DERPPort": 9991, "STUNPort": 3478, }, ], }, }, }, ``` 这个为自用 ```yaml "derpMap": { "Regions": { "900": { "RegionID": 900, "RegionCode": "腾讯-北京", "Nodes": [ { "Name": "tx-bj", "RegionID": 900, "HostName": "域名", "DERPPort": 9991, "STUNPort": 3478, }, ], }, }, }, ``` ## 看所有的(官方和自建)中继服务器的延迟 `tailscale netcheck` 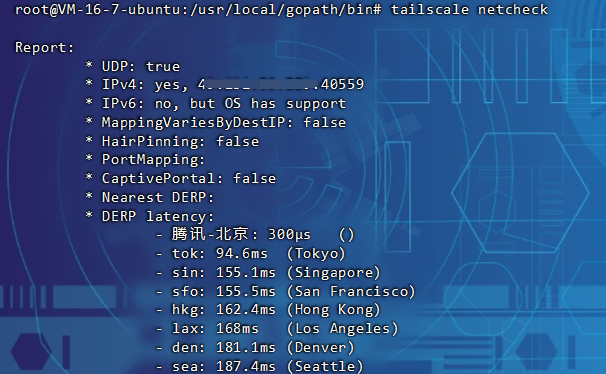 WMI Scripting HTML 当前访问者IP地址及地址归属: Last modification:December 6th, 2023 at 05:08 pm © 允许规范转载 Support 如果觉得我的文章对你有用,请随意赞赏 ×Close Appreciate the author Sweeping payments